

MIDBURN 2017 - THE LUCID ALBUM AND HOW I DID IT
Last year I attended Midburn, a regional burning man event taking place in the hot Israeli desert. I filmed nonstop for 5 days and created “We are Midburn”. The video ended up getting featured in quite a few websites and news outlets including the official Burning Man newsletter. Creating the video was quite the journey, but it also required me to extensively film non-stop during the entire event. So I pretty much experienced everything through my dusty camera lens.
When it was time to get ready for Midburn 2017, I decided I'll hold off the video this year. I wanted to be more present in the event and it wasn't possible if I was creating a video. But I did have an idea to try out something that has intrigued me for quite a while, and this year's Midburn "Lucid Dream" theme was the perfect setting.
WHAT IS LUCID DREAMING?
Before we begin, here is a quick rundown of what is lucid dreaming. As bizarre as it sounds, being able to control your dreams is a real thing. In fact, the movie inception relied heavily on the techniques and theories behind this phenomenon. I’ve dedicated 2 years of my life practicing it and although I only succeeded a few times, I can say that it is one of the most surreal and unique experiences anyone can have. So tie in this year’s Midburn theme, settings, wacky characters and the overall surreal vibe, and you got yourself the perfect ground for some of the best photos one may take.
THE PROCESS OF COMING UP WITH THE IDEA
I wanted my photos to tell a story, to pass the sensation of what it is to be at a Burning man event. I also looked for a way to have the photos play out the idea of lucid dreaming. I knew getting trippy photos would not be too difficult, but I wanted to find a way to bring the idea to life and show what it feels like to be within a dream. Not too long ago I saw started seeing photos on Instagram which I initially thought were cinemagraphs. But with further observation I noticed something was off and some of them seemed impossible. Considering cinemagraphs are partly photo, partly video, these photos were somehow different. They reminded me of my experiences with lucid dreaming. In a dream, before you become lucid, you might feel like you are conscious, but certain things might seem weird. It is only when you really realize something is off, that you are aware you are in fact in a dream.
WHAT IS PLOTAGRAPH:

Once I found the technique I wanted to use for my project, I needed to learn how it can be done. I found out that this type of animation can be made with Photoshop & Aftereffects (tutorial here). But it was a new software called Plotograph that I decided to use.
Plotograph is an app that allows you to turn every still image into a GIF or video file. It was created by the photographer Troy Plota and it’s really neat. The cool thing about this app is it’s simple to use, and acts as a social platform on its own. Allowing artists to animate their photos and upload them straight to the community hub for others to see.
I watched a few short tutorials on their official Youtube page (right here) and got a pretty good rundown about what can be done with the software. Then, I sat down to plan my project and discover how I can implant this technique to into my photographs.
TAKING THE PHOTOGRAPHS
Now, while there was no way of knowing what I would photograph and what kind of art installations would be present this year, I knew I should follow 2 main guidelines:
The 1st was making sure that in each photograph I took there was always at least one element that need would need to be animated. I figured that the best objects to animate would be those who are supposed to move. Cloth, fabric, dust, clouds, feathers, fire, hair, each photo should have at least one element for me to animate.
The 2nd guideline was that the photos needed to look dream-like. My goal was for those who see my photos to initially think it was a normal photograph, but with further observation discover they are in fact, moving.
When I got to the event, I dedicated the first day to walk around and scan for any interesting art installations, camps, people locations, and basically come up with an idea of how I want to bring life to this project. There were two main things that caught my eye. The first was the dust. I wanted it to have a key role in the project. In a Burning Man event, the dust is an un-separated and integral element in the experience, to the attendees, it almost has a cult status. The second thing I noticed is just how surreal and beautiful the light is in the dusty desert. Dust was always in the air and it was acting as a beautiful softbox to the strong sun light, giving every test photo I took a dreamy like feeling.
I went out with my camera on three separate occasions, each time for a few hours. I went to the locations I found and searched for the right people to help me make the reality into a dream. All the while maintaining my 1st guideline of making sure there would always be some kind of element to animate.
Here is an example which I will later go in depth on the process of animating them

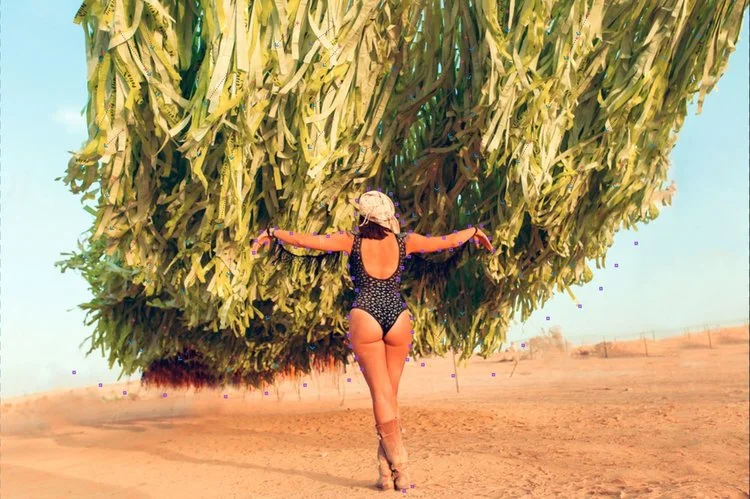
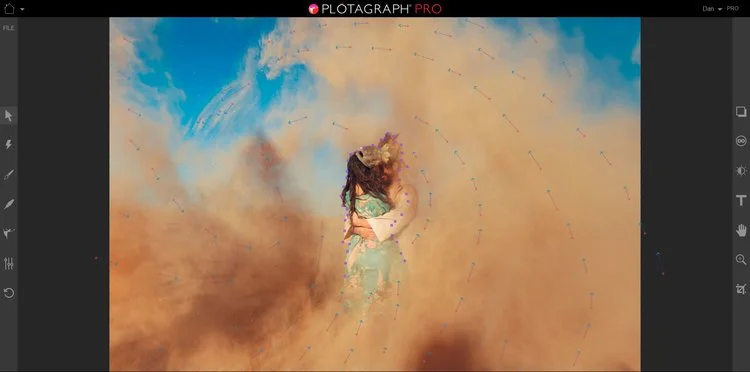
This photo, featuring my lovely wife, was taken at an art installation that was referred to as the “Car Wash” with long strips of nylon streamers almost touching the ground. When scouting I noticed how sometimes a gash of wind would raise the installation into the air. I had my wife stand in front of the installation and we waited for it to blow upwards. I took the photo knowing that later I would animate the streamers.
This is another photo featuring my wife walking in the desert. From my research on Instagram, I saw that some of the best uses of Plotagraph are clouds, dust, and water. I asked my wife to violently walk through the sand so I can later create a sense of advancing motion using the software.
THE EDITING PROCESS
After I got home (and sent my camera to be urgently cleaned at a lab) I sat down and culled through the photos to find the best ones to be animated. I then edited them all in Lightroom. I wanted to create a single look through all the images. I went for a saturated & surreal Mad Max kind of look to go along with desert setting. After creating the preset (which you can download here) I went and fired up Plotograph.
I won’t go into all the really awesome features this app provides but I will give a summary about how it works. The app uses simple keyframes and masks to determine which parts of the photograph will move and which parts will stay frozen.
While there are masking possibilities, I mostly used the “animated keyframes” and “stabilizing keyframes”.
The animated keyframes are key frames that when clicked on the photo and holding your mouse it would create a point, dragging the point will create an arrow. Depending on the direction of the arrow and where the mouse was clicked, the area in the photo will start moving in the set direction.
Dragging the arrow further will result in a more “smudgy” animation. While keeping the arrow short will create a shorter animation. I personally liked keeping my arrows short as it made the photos feel more realistic while still making them a bit trippy, staying true to the idea that I didn’t want people to notice something was off at first glimpse. Just like lucid dreaming.
The stabilizing key frames work great. They are simple to use and are to be placed on areas in the photo that should not move. I found out that I didn’t have to be extremely accurate with the stabilizing dots. Plotograph really shines in how easy it is to create these animations receiving good results on the first few tries.
HERE ARE A FEW EXAMPLES
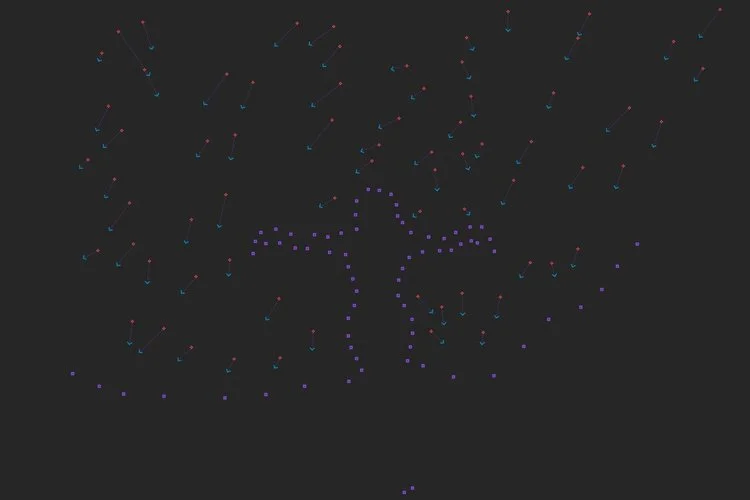
Let’s take the boots photo as an example to show the workflow. Notice I’ve created quite a few stabilizing points (the purple squares). But I have no stabilizing points on the upper left side of the photo. That is because I had no animation points there and there was already no movement. I also found there is no need to be 100% accurate when placing the dots and distancing them. Plotograph did a great job figuring out what I wanted to move and freeze.
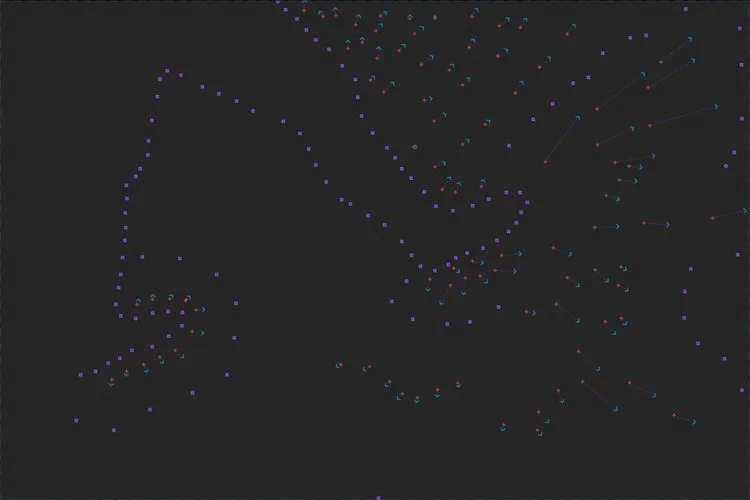
Using the nifty mask filters feature I could hide the image while leaving only the stabilizing & movement key frames. Doing so, easily allowed me to see all my placed key frames and analyze the movement that was created. The most important thing to remember is that movement should be simulated realistically. Obviously you can experiment for yourself but this is an example to show how the length of the arrows affect the movement in the image.
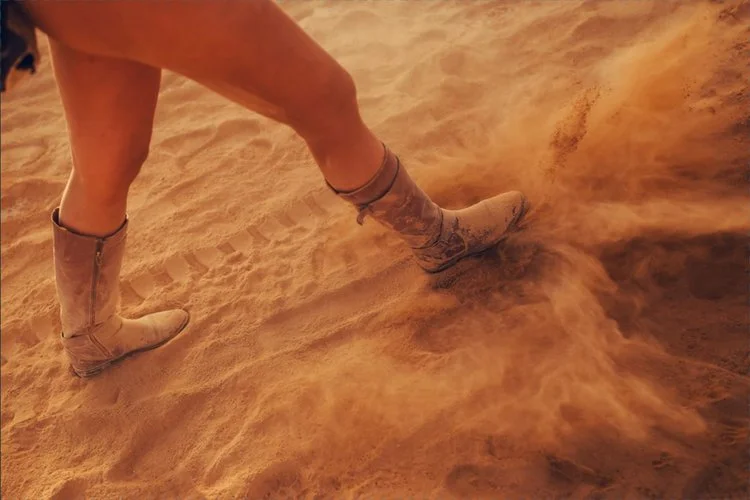
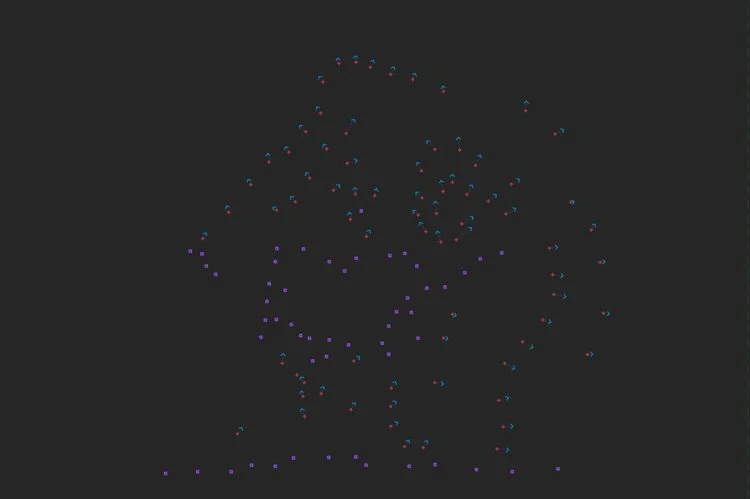
As you can see, where the impact on the dust was the strongest, it resulted a powerful dust splash. For those long splashes I used longer movement key frame arrows to simulate a more powerful movement.
I than added short arrow key frames around the left foot and right leg to give smaller movements. If you look on the right side of the photo, I added some stabilizing points on the darker patch of dust underneath the big splashes to hold it from moving. Resulting in a 3 dimensional feeling to it as the dust rises above the still ground.
In the Car Wash photo, I simulated the movement of the nylon streamers that were created by the wind direction.
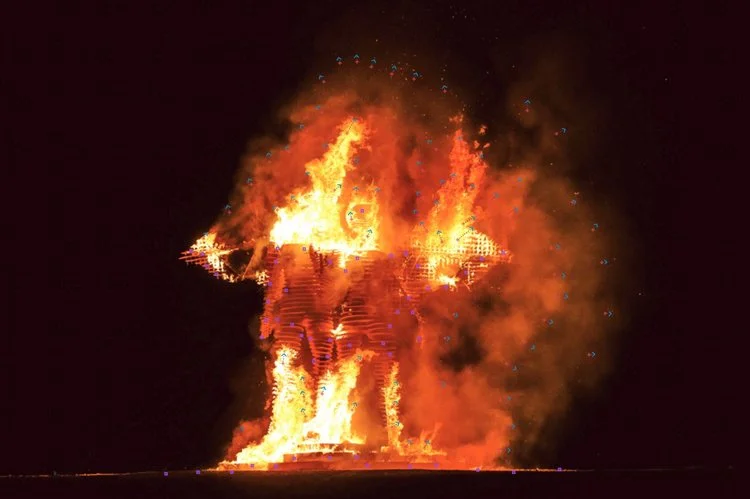
Another good use for plotagraph is to animate fire, specifically the burning of the effigy (a wooden sculpture that is burnt at every event). Fire is very chaotic and I initially thought it would be a mess to animate. But it was actually one of the easiest photographs to work on.
I placed stabilizing points on the wooden bodies that were still untouched by the fire. But when animating the fire, I placed the arrows close to each other but, facing different directions to give emphasis on how chaotic the movement is.
This next photo is one of my favorites, when I took it I already knew how I wanted the animation to look.
I wanted the body of the model to stay frozen while all the dust around him will be in motion. So before I took that photo I swiped the dust around the model and already created sort of a “path” for the dust to move on. Wind and people walking kept destroying the smooth sand pattern I created but I it actually resulted in a more interesting photograph and animation.


The feedback of this project was amazing. So many people from within the community and outside of it loved it. It received over 170,000 views on Facebook and was featured on Burning man official newsletter. One of the main feedbacks I kept receiving was people saying how, while looking at the photographs, they feel like they are tripping on acid. I’ve never tried acid myself but this made me that I was successful with my intentions to obstruct reality. As apparently, being in a lucid dream and doing acid is a very similar experience.
To see further animations check out my Instagram
I have to say, and this is aimed more to the creators of Plotagraph. Although this application is really amazing the only issue I had with it was the size of the dots. You have different presets that changes the colors of the dots (you can’t choose your own colors) but you can’t really change the size of them. This caused some difficulties on some photos where all presets were hardly visible. I’m sure this is something the creators of this app are aware of and hopefully this feature will be implanted sometime in the future.
All the photos were taken with my Canon 6D, a sigma art 35mm 1.4 and a Tamron 24-70 2.8.